my header links

| Home | Preschool Lesson Plans | Educator Forums | Preschool Lesson Plan Directory |Advertise on 123child.com | |

Wednesday, November 3, 2010

Thanksgiving - Turkeys

I can't imagine a Thanksgiving without a turkey. It's such a big part of the holiday that some people (my mom for one) call Thanksgiving Turkey Day. So no Thanksgiving Unit would be complete without a tribute to the main event, the yummy TURKEY!!!

Thanksgiving: Turkey - preschool lesson plans 

Turkey Headbands
Have the children cut paper strips to make a headband out of. They make glue, staple or tape the headband together. Provide the children with feathers, glitter, sequins or other materials for them to decorate the headband with. You can write "Turkey Suzy" on the headband.

Turkey Feather Painting
Provide each child with a feather, paint and paper. Ask the children paint a picture using the feather as a paintbrush.

Thankful Turkeys- image submitted by Mrs. Tricia
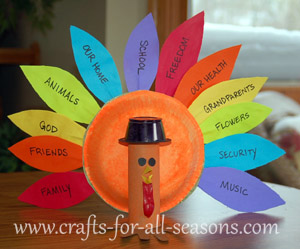
Students will dictate what they are thankful for. The teach will write their responses on feather shapes construction paper. The teacher or child could cut out the feathers, depending on the ability level of the student. The child's foot is traced onto brown paper and cut out to be used as the turkey's body. The child will then glue the feathers onto a piece of paper or a paper bowl. The body is glued on top of the feathers. After the glue dries, the turkey's facial features can be drawn with a pen or marker.

Hand and Foot Turkey
Trace students foot prints onto a piece of brown construction paper then have the child cut out their foot shape. This will be the body of the turkey. Trace several of the child's handprints onto yellow red and orange construction paper. Have the child cut out their handprint shapes. These will be the feathers. Have the children glue their handprints behind the footprints so the fingers stick out over the foot shape like feathers. Add facial features with a pen or marker.


Hand Turkey
Paint the palm of your child's hand brown, as well as their thumb. Then paint each of their fingers a different bright color such red or blue. Have the child press their hand onto a piece of white paper. For older children, let them draw on feet and characteristics such as eyes and nose. The thumb represents the turkey’s neck and the palm the body.


Paper Plate Turkey
Have the children paint one large and two small paper plates brown. The large paper plate with be the turkey's body, one small plate will be the head and the other small plate will make the wings. Cut one small paper plate in half and glue it to the sides of the large plate. The whole small plate will be glued to the top of the large plate. Have the children trace their hand prints onto different colors of construction paper and cut them out. These can be glued to the back of the large paper plate for the feathers. Add construction paper eyes, beak, waddle and feet.

Turkey Feather Game
Find a picture of a turkey that you like. Make six copies of it. Cut out the bodies of the turkeys (so you just have to add the feathers to make the turkey complete). Write the number "one" on the first turkey, two on another; repeat with the numbers three through six. Provide the children with twenty-one feather shapes, cut from construction paper or store bought craft feathers. Ask the children to place the appropriate number of feathers on each turkey. One feather on the turkey with the number one it... and so on.

Turkey/Feather Rubbings
Cut turkey or feather shapes from paper doilys or sandpaper. Tape these shapes to the table. Have the children place a piece of thin white paper over the shapes and rub a crayon over the shape.

Cookie Cutter Painting
Put a small amount of tempera paint in a large shallow container. (A pie tin works well) Show your child how to dip the turkey shaped cookie cutter in the paint and press onto a piece of paper to create a print.

Sticker Art
For a very simple art project, supply the children with a piece of paper and stickers. For younger children this provides an excellent fine motor activity.

Plastic Spoon Turkey
Have the children cut out several feather shapes from construction paper. Glue the feathers to the easting surface of a plastic spoon. On the reverse side, add googly eyes and a paper beak. For the waddle, cut the end off of a red balloon and glue it to the handle of the spoon and finally glue a bow tie cut from construction paper over the balloon.

Pine Cone Turkeys- image submitted by Mrs. Tricia
Children will push play dough or clay into the spaces between the pine cones leaves. The children can then stick different colored feathers into the play dough. An adult can use a hot glue gun to add the wiggly eyes and the pipe cleaner beak.

Feather Sorting
Cut out several different feather shapes from construction paper or provide the children with store bought craft feathers (can be used the above activity as well). Ask the children to sort the feathers according to color. Ask the children "How many red feathers do you have?" etc.

Thankful Turkey Headbands- image submitted by Mrs. Tricia
Have the children dictate three things they are thankful for and write those three things on pre-cut construction paper feathers. Have the children cut brown paper strips to make a headband out of. They may glue, staple or tape the headband together. Have the children add a little bit of glue to the bottom back of each feather and glue onto the headband. Finally, the turkey face can be added.

Do the Turkey Pokey
Sing the Hokey Pokey like normal, but then the last line goes as follows: "You do the Turkey Pokey and you gobble all around, that's what it's all about." You can also say wing instead of arm and add a verse about the tail.

Pin the Feather on the Turkey
Played just like pin the tail on the donkey. Provide the children with a huge turkey shape, and feathers. You may want to use tape instead of pins to attach the feathers on the turkey. Blindfold one child and have them tape the feather on the turkey.

Feather or Turkey Hop
Cut out large feather or turkey shapes from colored paper. Laminate them and cut them out. Place them on the floor and ask the children to hop from one feather or turkey to another. These may also be used at seat markers for group time.

Turkey Feather Games:
-Cut out feather shapes from different colors of paper. Give each child one feather. Ask the children to find one person with the same color feather.
-Cut out feather shapes from different colors of paper. Cut the feather in half using a puzzle type cut, like zig zag or interlocking pieces. Give each child one half of a feather, and ask them to find the person with the other half. Or Give the children two pieces and have the children make a circle, with one child that has one match on one side and the other match on the other side. You may end up with 2 or more circles depending on how the feather pieces are distributed.
-Cut out feather shapes from one color of paper. Cut the feather in half using a puzzle type cut, like zig zag or interlocking pieces. Give each child one half of a feather, and ask them to find the person with the other half. Or Give the children two pieces and have the children make a circle, with one child that has one match on one side and the other match on the other side. You may end up with 2 or more circles depending on how the feather pieces are distributed.
-Cut the feather shapes from one color of paper. Label one set of feathers with numbers, i.e. if you have 20 children; label the feathers with the numbers one to ten. The other half, draw one dot on one, two on another, and so on until ten. Give each child one feather and have them find the child with their match.
-Cut the feather shapes from one color of paper. Place matching stickers on two feather. Give each child one feather and have them find the child with their match.
-Cut the feather shapes from one color of paper. Cut the feather in half using a puzzle type cut, like zig zag or interlocking pieces. Place matching stickers on each half of a feather. Give each child one feather half and have them find the child with their match.
-Try all the above, but in a file folder format. Glue one part of the feather to the file folder and laminate it's match.

Ten Fat Turkeys
original lyrics by Amber Leigh from 123child.com
sung to "Ten little Indians"
1 fat, 2 fat 3 fat turkeys,
4 fat, 5 fat, 6 fat turkeys
7 fat, 8 fat 9 fat turkeys
10 fat turkeys ready for Thanksgiving

I'm a Little Turkey
original lyrics by Amber Leigh from 123child.com
sung to "I'm a Little Teapot"
I'm a little turkey short and fat
I have many feathers spread out like that (hold hands with firngers spread)
When Thanksgiving feast comes my way
I will hid and run away.

Five Little Turkeys Poem
original by Amber Leigh from 123child.com
Five little turkeys on Thanksgiving Day
One got scared and ran away.
Four little turkeys playing hide and seek,
One turkey hid and fell asleep
Three little turkeys sit near the gate
One went home, it was late.
Two little turkeys wonder what to do
One got bored and went home too.
One little turkey thought "Isn't this great"
He's the one that's on my plate.

Songs from Kididdles.com
Albuquerque Turkey
Turkey in the Straw
Turkey, The

Five Fat Turkeys
Five fat turkeys sitting on a fence. (One hand up)
The first one said, 'I'm so immense.' (Point to thumb)
The second one said, 'I can gobble at you.' (Pointer finger)
The third one said, 'I can gobble, too.' (Middle finger)
The fourth one said, 'I can spread my tail.' (Ring finger)
The fifth one said, 'Don't catch it on a nail.' (Little finger)
A farmer came along and stopped to say (Pointer finger of other hand.)
Turkeys look best on Thanksgiving Day.

Turkey Foot Hop
Cut out many turkey footprint shapes from construction paper and affix them to the ground with contact paper. Have the children hop from one shape to the next. You could also play the song "bunny hop" and have the children gobble and hop from shape to shape.

Musical Turkey Feet
Cut out many turkey footprint shapes from construction paper and affix them to the ground in a circle with contact paper. It is better to have more shapes than children. Play music and have the children walk around the circle. When the music stops they find a turkey footprint to stand on.

Duck Duck Turkey
Play duck duck goose, but say turkey instead of goose.

Candy Turkey
Microwave one Oreo cookie for 20 seconds to soften the icing. Place seven candy corn pieces, white side first into the edge of the Oreo cookie to represent the feathers. Place a dab of frosting on the top and side of a mini peanut butter cup. Stick the top to the Oreo with the candy corn and the side to another Oreo for the base. Apply a dab of frosting to a Whopper and place on the peanut butter cup. I used a tube of orange icing for the eyes and feet. The nose was made with the tip of a candy corn dipped in icing.

Monday, November 1, 2010

Thanksgiving - being thankful

Thanksgiving: being thankful - preschool lesson plans


Thankful Collage
Ask the children to finish the following sentence:
I am thankful for _____________.
Write their answer on a sheet of paper then have them draw a picture of what they are thankful for.
You can also have them cut out pictures from magazines, use paint, crayons, or other items to create the artwork.


I am Thankful for my Family Art
Show your child how to make finger prints on a piece of paper. Have your child draw eyes, nose mouth and hair to create a face. Ask the children to name the people in the picture.  Write the family names below each print.


I am Thankful for my Family Art 2
Ask the children to create a paper plate face of someone in their family.  Have the children draw facial features onto a paper plate to make a face. Supply the children with yarn or easter grass for hair.


I am Thankful for my Family Art 3
Supply the children with non-toxic bingo dabbers. Ask the child to dab a piece of paper with the dabber a couple of times. When dry, have the child add a face to the dots. Ask the child to tell you the names of the people in the family in their picture. Label the people for them.


Thanksgiving Pictures
Ask the parents to share pictures of their family celebrating Thanksgiving.  Affix the pictures to the wall at eye level with contact paper.


Thankful Game
Have the children sit in a circle and they should have a bean bag or stuffed toy to pass around the circle.  Have the children pass the item around the circle while they chant:
Thanksgiving, Thanksgiving,
What am I thankful for,
It's your turn to share with us,
1, 2, 3, 4
Whomever is holding the item when the chat is done should share what they are thankful for.


I Love My Family Because....
Have the children finish the sentence "I Love My Family Because..." Write down the children's answers and post them on a bulletin board.


Thank You Cards
Have the children make thank you cards. Have the children give the card to someone special.


Songs from Kiddiddles.com
Father, We Thank Thee 
Thank You, Lord, For This New Day 
Thanksgiving Fable, A 
Thanksgiving is Coming, Hurray! 

I am Thankful
by chicky-ma-ma
(sung to "Where is Thumbkin?"
I am Thankful, I am Thankful
Yes I am, Yes I am
I am Thankful for my friends
I am thankful for my kin
Yes I am, Yes I am
(Explain that kin is another word for family! )

submitted by Ms. Tricia
Thankful Turkey Headbands
Have the children dictate three things they are thankful for and write those three things on pre-cut construction paper feathers. Have the children cut brown paper strips to make a headband out of. They may glue, staple or tape the headband together. Have the children add a little bit of glue to the bottom back of each feather and glue onto the headband. Finally, the turkey face can be added.

Thankful Tag
Play thankful tag, just like freeze tag.  To become unfrozen, a friend has to come by and touch the frozen child and say something they are thankful for.
For younger children, just have them say something they are thankful for to be unfrozen.

Thankful Tree
On your bulletin board create a tree trunk shape with brown construction paper.  Label the board (your class name) Thankful Tree).  Cut out several leaf shapes from construction paper.  Have the children draw what they are thankful for on the leaf, then place the child's name and what they are thankful for on the leaf.  Place the leaves on the tree.

Individual Thankful Trees
Have the children tear red, orange and yellow paper to create leaves that are big enough to write on.  An adult will ask the child what they are thankful for and each answer will go on a leaf. Children can tear pieces of brown paper and glue them onto a sheet of construction paper to create a stump.  Then they can add their thankful leaves.

Paper Plate Thankful Wreath
Have the children cut out a variety of leaf shapes from different colors of construction paper.  (for younger children you can do this step)  On as many leaves as you need to, write all the things the child is thankful for.  Then have the child glue the leaves onto the edge of a paper plate.  In the center write "(child's name) is thankful for:".

Thankful Hand Print Tree
On your bulletin board create a tree trunk shape with brown construction paper. Label the board (your class name) Thankful Tree). Trace the children's hands onto different colors of construction paper.  Have the children draw what they are thankful for on the hand shape, then place the child's name and what they are thankful for on the shape.  Place the hand prints on the tree.  

image submitted by Ms. Tricia
Thankful Turkeys
Students will dictate what they are thankful for. The teach will write their responses on feather shapes construction paper. The teacher or child could cut out the feathers, depending on the ability level of the student. The child's foot is traced onto brown paper and cut out to be used as the turkey's body. The child will then glue the feathers onto a piece of paper or a paper bowl. The body is glued on top of the feathers. After the glue dries, the turkey's facial features can be drawn with a pen or marker.


Book Ideas:
Little Critter: Just So Thankful
I'm Thankful Each Day
The Most Thankful Thing
Let's Be Thankful

Sunday, October 31, 2010

Thanksgiving

Thanksgiving is most surely one of my most favorite holidays.  I think mostly just because of the warm memories associated with it.  Family, friends and of coarse, great food.  When speaking to the students at my former school, I admit, I was shocked to hear that not every Thanksgiving was like the ones I have enjoyed.  I guess it was my naive, living in a bubble mentality shining through.  Even the staff luncheon was a far cry from the regular foods I was used to on Thanksgiving.  I'm glad to be back in Michigan, close to my mom and dad, where I know Thanksgiving will be reminiscent of the celebrations of my youth.  Oh, and let's not forget the Fudge appetizers.  (I know, it's a strange family tradition.)


pilgrims

Thanksgiving Lesson Plans - toddler, preschool and kindergarten

Some questions to pose to your little ones:
- What is Thanksgiving about?
- What does it mean to you and your family?
- How do you celebrate?  (If at all)
- What kinds of foods do you eat?
- Where do you celebrate?
- What is the best part of Thanksgiving?
- Why do we celebrate Thanksgiving?
- How did it come about that we celebrate Thanksgiving?
You can pose these questions in a large or small group.  Or one on one.  It might be fun to record the children's answers and post them on your bulletin board or in the room.

What do you want the children to learn from this lesson?
foods commonly associated with Thanksgiving
different ways people celebrate Thanksgiving
how do other cultures celebrate the harvest
the history of Thanksgiving

The Food:
Turkey - the main event
mashed potatoes
stuffing
gravy
cranberry sauce
corn
sweet potatoes
buttered rolls
pumpkin pie

Other common foods:
green bean casserole
yams
squash
rice
sauerkraut
cornbread
dumplings
hominy
deviled egg
peas and carrots
biscuits
rutabaga
turnips
salad
apple pie
mincemeat pie
sweet potato pie
chocolate meringue pie
pecan pie
apple cider
egg nog
banana pudding
macaroni and cheese
collard greens
sweet corn relish
pumpkin soup

Different ways to celebrate
watching football
going to a parade
watching a television special
shopping (black Friday)
Thanksgiving gifting
going to a movie
day after Thanksgiving - Christmas decorating

Multicultural Harvest Celebrations:
August Moon Festival (Chinese)
Tet Trung Thu (Vietnamese)
Thanksgiving (American)
Succoth (Jewish)
Kwanzaa (African)
Pongal (Indian)
Yam Festival (African)
Chusok (Korean)


The History:
The First Thanksgiving
Wikipedia - Thanksgiving
It is thought that the first Thanksgivings were held as celebrations to thank god and enjoy the wonderful bounty of food.  The Pilgrims were also thankful to the Native American Indians that taught the them how to cook and survive in the New World.
While I think it is important to honor the Native Americans for their contributions to the survival of the immigrants, we should not turn our whole focus of Thanksgiving to a study of Pilgrims and Indians.  Nor should the only mention of Native Americans, or Indians occur during Thanksgiving.
Please check out this great link:
Resources For Non-Native Classrooms

Friday, October 29, 2010

the Letter "Q" Preschool Lesson Plans

queen
quiet
quick
quilt
quail
quill
Q-tips
quack
quacker
quarter
quiche
question
quest
quartet
quote
Quacker Oats
Quacker Oatmeal Cookies
Quesadilla
quick bread
queso (cheese)


Quartermaster Corps, The 


So, if you have any more, please let me know.  Usually I have a ton more words than this!!!


Ducks say "Quack", so check out the preschool Duck lesson plans.


Letter "Q" Activities


The Letter "Q" Stamps
Let the children use the Letter "Q" stamps or sponges with paint to create an art project. You can also do this activity with question mark stamps/sponges.


image submitted by Julia
The Letter "Q" Collage
Have the children cut out the letter "Q" from magazines and glue them onto a piece of "Q" shaped paper.  You can also have the children cut out questions marks.


Decorate a Letter
Cut out the letter "Q" from construction paper. Have the children decorate the letter "Q" with glitter, paint, markers or other art materials.  The children can also decorate a questions mark.  


Glue Letters
Place glue on a piece of paper in the shape of the letter "Q". Have the children place glitter, colored rice or koolaid on the glue.  Alt.  use a question mark shape.


Contact Paper Art
You will need a reverse image of a letter "Q". Place the image on the table and place a piece of contact paper, sticky side up over the image. Supply the children with scraps of construction paper or tissue paper. (Pieces of a plastic lei were used for the photo of this project) Children use the scraps to create the image on the contact paper.  You can also use a question mark shape.


Letter Art
Place masking tape on a piece of finger painting paper to create the letter "Q". Allow the child to paint the picture. After the paint had dried remove the tape.  You can also use a question mark shape. 


Cotton Letters
Place glue on a piece of paper in shape of the letter "Q". Have the children place cotton balls on the paper.  Alt.  use a question mark.


Letter Rubbings 
Cut the letter "Q" from paper doilys or sandpaper. Tape these letters to the table. Have the children place a piece of thin white paper over the letters and rub a crayon over the letter. 
Alt.  use question mark shapes.


Letter Shaped Potato Prints 
Cut a large potato in half. You will need a "Q" letter or question mark shaped cookie cutter that will fit on the potato half. Press the cookie cutter into the flat side of the potato. Then, using a knife, cut the potato around the outside of the cookie cutter, leaving a letter shaped potato stamp. Supply the children with the potato stamps, different colored paints, and paper. Have the children dip the potatoes in the paint and press them firmly onto the paper. If the potatoes are not cut evenly the shapes will not appear clearly. 


Letter Match
Write upper case letter "Q" on one set of index cards in different colors and lower case on another. Have the children find the matches.


Bean Bag Toss 
Obtain a large piece of cardboard. A large, unfolded box works well. Cut the letter P out of the cardboard. Paint the cardboard. When dry let the children throw bean bags through the holes. 


Letter Hop 
Cut out large "Q" shapes or question mark shapes from colored paper (shelf liner works REALLY well). Laminate them and cut them out. Place them on the floor and ask the children to hop from one letter to another. These may also be used at seat markers for group time. 


Letter Bingo
Click here to see an image of this project
Create your own bingo cards and call letters for a bingo game. Your flash cards can be the same case or a different case than the bingo cards. You can also use images that begin with the letter "Q".


The Letter "Q" Pretzels
Make your own pretzels and shape them like letters of the alphabet. 


The Letter "Q" rolls
Shape roll or biscuits into letter shapes before baking.


The Letter "Q" Cookies
Use your favorite sugar cookie recipe to maek the dough. Use letter shaped cookie cutter, bake. When cool decorate as desired.


Musical Chairs
If they children made crowns, have them wear them during this activity. Arrange the chairs in a circle. If you have younger children it is best to have too many chairs. This can be a game where everyone wins. Place different color Q shapes, or images of items that begin with the letter "Q" on each chair. Have the children walk around the chairs until the music stops. Then everyone finds a chair. Ask who is sitting on a chair with a red "Q"? Blue? Etc.


Royal Red Rover
Draw different color "Q"'s on index cards or glue on images of items that begin with the letter "Q". Affix yarn to the cards to create necklaces. Each child gets one card to wear. The game: "red rover red rover, send your blue "Q"'s on over" and the children wearing blue "Q"s run to the other side. 


Art Ideas
Mix a little bit of Quacker Oatmeal into paint
Decorate Q shaped paper
Decorate question mark shaped paper
Use Q or question mark stickers
Have the children make something that represents quick or quiet
Use Q-Tips to paint with
glue Q-tips to a piece of paper
Make quarter prints by pressing a quarter onto an inkpad then onto paper
Paint with a quill (or a feather)


Queen Activities


Queen's Crown Matching
cut out several different colored crown shapes and decorate them in pairs so there are two that are identical. Have the children match up the identical crowns. 

Save the Queen
Create a circular moat by taping blue paper to the floor. Have the chilren try to hop over the moat to save the queen in the center (a stuffed animal).  Then jump back out.


Create a Queen's Crown (King for boys)
Measure your child's head, and cut a piece of construction paper long enough to create a headband. Cut the construction paper to form the design of a crown. The children can decorate the crown with crayons, markers, paint, glitter or even jewels (bling). Glue the paper together so the headband fits snugly on your child's head but is loose enough to take off easily. 


What time is it Queen/King? (or Mr. Quack, Ms. Quarter, Mr. Q, Ms. Question)
This is a fun game to play outside. You can change the name to suit any theme. The children all line up against a wall or fence. And one child, Queen/King or the teacher faces away from the children, a good distance away from the children. The children yell, what time is it "Queen/King", Queen/King answers 1 o'clock, and the children all take one step toward Queen/King. The children yell again, what time is it "Queen/King", Queen/King answers (fill in the blank) o'clock, and the children all take same number of step toward Queen/King. This continues until all the children are very close to Queen/King, then Queen/King will answer it's midnight, and chases the children back to the fence or wall that they started at. The first person Queen/King touches will be the new Queen/King. 


Dramatic Play
Provide the children with pretend crowns, capes, wands and other items to go along with the castle theme. Children can pretend to be Kings and Queens

Build a castle in the block area

Queen/King Dance
Have the children wear their crowns and dance.

Queen/King Wands
Each child will need a unsharpened pencil or dowel and a few pieces of streamers and tape. Have the child tape the streamers onto the pencil, they may also add star stickers on the pencil for decoration.
Children can wave the wands around to music.

Other Games
Simon says becomes "Queen/King" says
Mother May I can be "Queen/King may I?"
Duck duck goose can become "Queen, Queen, Jester"

Royal Play Dough
The children can add glitter into the play dough for a special treat.

Queens and Kings
by Amber Leigh
Sung to "Teddy Bear"
Queens and Kings
Turn around.
Queens and Kings
Touch the ground.
Queens and Kings
Shine your shoes. 

Queens and Kings, skidoo

Queens and Kings
Go upstairs.
Queens and Kings
Say your prayers.
Queens and Kings
Turn out the light.
Queens and Kings
Say good night.


Other Q Activities


Quiet Activities
Have the children be loud, then quiet.  You can also turn on the lights for loud, and off for quiet.
Have the children walk across the room quietly, then loudly.


Quick/Slow
Have the children walk across the room slowly, then quickly.
Have the children sing a song slowly, then quickly.


Quick Jump up and Down
Sing Jump Up and Down quickly, then quietly
Jump Up And Down.mp3
Jump Song
Everyone, Everyone, Jump up and Down
Jump up and down, Jump up and Down
Everyone, Everyone, Jump up and Down
Now Sit Back down


Play Duck, Duck Goose
But instead of saying duck, say "Quack" and instead of goose say "honk".


Quilts
Have the children create quilts from paper.  They can each do one pictures and then put them together to form a quilt on the bulletin board.  Or children can make their own quilt from smaller pieces of paper.  


Quarter Rub
Place several quarters under a sheet of paper and have the children rub a crayon over the paper to create a quarter shape on the paper.  


Math Center
Place the numbers one thorugh six on six small post it papers. Place these papers in the bottom of each muffin tin hole. Have the children place one object in the one space and two in the two and so on. Ideas for objects: Quarters, Q-tips


Estimation Jars
You will need 4 clear jar that are the same size. Fill one jar about 1/4 of the way with objects. Count the objects as you fill the jar and end on a round number, like 10 or 50. Write the number of objects on a post it, place the post it on the jar. Fill the second jar about 1/2 way with objects, again counting and recording and posting on the jar. The third jar should be filled about 3/4 of the way with objects and again record the number and post it on the jar. The last jar you can fill however you like, place a post it on the jar with a question mark. Allow the children to observe the four jars together and guess how many objects are in the fourth jar. Record the children's guesses. After everyone has guessed, count the objects together. Show the children how the number of objects in the first three jars is related to the fourth jar.  Ideas for objects: quarters, Q-tips


Questions:
Talk about questions.  What is a question?  Have the children practice asking questions.


Sesame Street Videos:

Q-queen Quagmire


Sesame StreetQ: Herry and John John
Big Bird Quickie Q-quack

Quacking With Q

Wednesday, October 27, 2010

The Letter "P" once more...

The Letter "P" Stamps
Let the children use the Letter "P" stamps or sponges with pink or purple paint to create an art project.

The Letter "P" Collage

Have the children cut out the letter "P" from magazines and glue them onto a piece of "P" shaped paper or a paper plate.


Decorate a Letter
click here to see an image of this project- image submitted by Julia
Cut out the letter "P" from construction paper.  Have the children decorate the letter "P" with glitter, paint, markers or other art materials.

Glue Letters
Place glue on a piece of paper in the shape of the letter "P". Have the children place glitter, colored rice  or koolaid on the glue.

Contact Paper Art

click here to see an image of this project
You will need a reverse image of a letter "P". Place the image on the table and place a piece of contact paper, sticky side up over the image. Supply the children with scraps of construction paper or tissue paper. (Pieces of a plastic lei were used for the photo of this project) Children use the scraps to create the image on the contact paper.

Letter Art

Place masking tape on a piece of finger painting paper to create the letter "P". Allow the child to paint the picture. After the paint had dried remove the tape.

Cotton Letters

Place glue on a piece of paper in shape of the letter "P". Have the children place cotton balls on the paper.


Letter Rubbings
Cut the letter "P" from paper doilys or sandpaper. Tape these letters to the table. Have the children place a piece of thin white paper over the letters and rub a crayon over the letter.

Letter Shaped Potato Prints
Cut a large potato in half. You will need a "P" letter shaped cookie cutter that will fit on the potato half. Press the cookie cutter into the flat side of the potato. Then, using a knife, cut the potato around the outside of the cookie cutter, leaving a letter shaped potato stamp. Supply the children with the potato stamps, different colored paints, and paper. Have the children dip the potatoes in the paint and press them firmly onto the paper. If the potatoes are not cut evenly the shapes will not appear clearly.

Letter Match
Write upper case letter "P" on one set of index cards in different colors and lower case on another. Have the children find the matches.

Bean Bag Toss

Obtain a large piece of cardboard. A large, unfolded box works well. Cut the letter P out of the cardboard. Paint the cardboard. When dry let the children throw bean bags through the holes.

Letter Hop

Cut out large "P" shapes from colored paper (shelf liner works REALLY well). Laminate them and cut them out. Place them on the floor and ask the children to hop from one letter to another. These may also be used at seat markers for group time.

Letter Bingo

Click here to see an image of this project
Create your own bingo cards and call letters for a bingo game. Your flash cards can be the same case or a different case than the bingo cards. You can also use images that begin with the letter "P".


The Letter "P" Pretzels
Make your own pretzels and shape them like letters of the alphabet.

The Letter "P" rolls

Shape roll or biscuits into letter shapes before baking.

The Letter "P" Cookies

Use your favorite sugar cookie recipe to maek the dough. Use letter shaped cookie cutter, bake. When cool decorate as desired.

Monday, October 25, 2010

The Letter "P" - continued

Peanut Butter Pine Cones
Cut a long piece of yarn or ribbon to hang the bird feeder. Tie the ribbon in a knot around the pine cone near the top. Spread peanut butter on the pine cone then sprinkle birdseed over the pine cone. Hang the bird feeder on the tree. 


Paint with a Pine Branch
Let the children use a pine branch for a paint brush.  They can paint with pink or purple paint.


Pots and Pans
Allow the children to play with pots and pans.  Supply them with a variety of other items, such as pretend foods and wooden spoons.  Children can bang on the pots and pans, or pretend to cook.


Princess and the Pea
Tell the story of the princess and the pea.


Puzzles
Have the children put together a variety of puzzles.


Puzzle Piece Art
The children can use paste to affix puzzle pieces to a piece of paper. 


Puzzle Piece Sort
Supply the children with puzzle pieces from old puzzles.  Have them sort the pieces.  Ask them how they sorted the pieces.  (color, size, shape)


Puzzle Math
Place the numbers one thorugh six on six small post it papers. Place these papers in the bottom of each muffin tin hole. Have the children place one puzzle piece in the one space and two in the two and so on.  You can also use: pennies, potato chips, pom-poms, pipe cleaners, peanuts, pine needles, puzzle pieces, popped popcorn, popcorn kernels, pencils, pebbles, pretzels.

Estimation Jars
You will need 4 clear jar that are the same size. Fill one jar about 1/4 of the way with items. Count the items as you fill the jar and end on a round number, like 10 or 50. Write the number of items on a post it, place the post it on the jar. Fill the second jar about 1/2 way with items, again counting and recording and posting on the jar. The third jar should be filled about 3/4 of the way with items and again record the number and post it on the jar. The last jar you can fill however you like, place a post it on the jar with a question mark. Allow the children to observe the four jars together and guess how many items are in the fourth jar. Record the children's guesses. After everyone has guessed, count the items together. Show the children how the number of items in the first three jars is related to the fourth jar.  Ideas for items: pennies, potato chips, pom-poms, pipe cleaners, peanuts, pine needles, puzzle pieces, popped popcorn, popcorn kernels, pencils, pebbles, pretzels.


Pom Pom Sort

Supply the children with different colored and sized pom-poms.  Have them sort the pieces.  Ask them how they sorted the pieces.  (color, size)

Parachute Play
Add small stuffed animals to your parachute play. The children can try to keep the animals on, or try to get them off quickly. If you do not have a parachute, a large light blanket or sheet will make a good substitute.

Picnic
Have a picnic on a nice day.  Serve foods that begin with the letter "P".

Art Ideas:
Children can decorate:
Pink paper
Purple paper
paper plates
pine cones
"P" coloring page
popsicle sticks
Children can use:
Pine cones to paint with
Pine branch to paint with
pussywillow branch to paint with
Paint brush to paint with
puffy paint
purple or pink paint
purple or pink markers
purple or pink crayons
purple or pink colored pencils
pencils
pens
pom-poms
paper clips
puzzle pieces
play dough
pipe cleaners
torn pink or purple paper
pumpkin seeds
peanut shells

Potato Prints 
Cut a large potato in half. Supply the children with the potato half, different colored paints, and paper. Have the children dip the potatoes in the paint and press them firmly onto the paper. If the potatoes are not cut evenly the shape will not appear clearly.

Popsicle Picture Frame
You will need six popsicle sticks, tacky glue, puzzle pieces, two small magnets, construction paper and a picture of the child. Then you make a frame with four popsicle sticks. Lay two stick parallel to one another (stick 1 and 2) then complete the from with sticks 3 and 4. Then to make the picture stay in you will need to add stick 5 and 6 on the top and bottom of the frame. So you have sticks 3 and 4 (the sides) with a stick on the top in front, top in back, bottom in front and bottom in back. Follow? Connect these sticks with glue. When dry have the children decorate these sticks with paint. Let that dry. Then let the children glue puzzle pieces on the frame. Let that dry. Cut a piece of paper to fit the back of the frame. Glue that on. Cut the picture to fit in the frame, and insert the picture. Then glue the magnets at the top and bottom of the back of the frame.

Pussy Willow
Make pussy willows with cotton balls and Popsicle sticks. 

Push and Pull Toys
Have the children push and pull toys around the classroom.

Pepper Prints
Cut a large pepper in half. Supply the children with the pepper half, different colored paints, and paper. Have the children dip the peppers in the paint and press them firmly onto the paper. If the peppers are not cut evenly the shape will not appear clearly.

Taste Test
Have the children taste red, green and yellow peppers.  Ask the children which they like the best. Graph the results.  

Paper Clip Chain
Have the children create a paper clip chain.  The children can also create a pattern with the paper clips if you use colored paper clips.  

Peek a Boo
Play peek a boo with your child.

Pease porridge hot, pease porridge cold,
Pease porridge in the pot, nine days old;
Some like it hot, some like it cold,
Some like it in the pot, nine days old